Jetpack

This is my Jetpack that was a student directed project. I found it pretty easy to make since I am already familiar with Rhino. The background image gave it more of an atmosphere. I used commands such as bend, boolean difference, mirror, polar array, and rotate. I made a short animation that has him flying through the air with a jetpack, which you can see in the Rhino Videos page.
Cinch Connector

The Cinch Connector was pretty easy because I had a tutorial to make it. I like the way it came out even though I had some problems with it. It took me about three days to finish it.
Jewelry

For the Jewelry project I made a necklace along with a jewelry box. I added a few extra things such as a mirror, lipstick, and two rings. I like how it came out, especially the jewelry box which I spent a lot of time on. I used commands such as rotation, boolean difference, mirror, and copy. What I felt I could have done more is to put more detail into the necklace.
Design I

Design II

Design III


Reflection
My reflection is to put more detail into my Rhino projects, such as my jewelry project. I felt I could have made a better design, but I felt I went with the right choice.
Robot

This is my robot project that I started earlier than it was assigned. I created the 1st robot with a bigger body piece. I made my 2nd robot have a tube connecting its body to its legs. I made some parts smaller for my second robot such as the body and two spheres where the hips would be.
Problem
The problem is that I need protection which I will get from my danger sensing robot.
Design I

Design II

Design III


Student Directed Project: Christmas Tree

This is my second student directed project of the year. It was Christmas when I started making this and I felt the Christmas spirit. For this project we had to use lighting, so I put a spotlight on the tree and the fireplace and a light outside the window. The tree was made by using add plant and then I made all the ornaments and presents around it. I decided to add a fireplace so I could put stockings on it.


Fire Drill Walkthrough

This is the Fire Drill Walkthrough that we were assigned. The walkthrough is from Mr. Croke's computer room to the doors that lead outside. In the computer room, I created several computers on tables and two doors that lead to the hall. I used many commands to create this project, such as Boolean Difference, Extrude, Rotate, Scale, and Copy.


Reflection
While creating my fire drill walkthrough, I encountered some problems that I could easily fix. When I put walls to make the hall, it was all dark and you couldn't see anything. I solved this by putting spotlights above to add light. I also had another problem, my computers were not proportional to the door. I solved this by scaling the computers and tables to be proportional to the doors. I used some different commands that I don't usually use such as Extrude and Scale. I added some details to the computers by putting the Dell emblem on them. This project let me experiment with different commands and gave me a chance to use view constraints.
Lap Top

When I started creating my lap top I already had known was I was going to make. I first started with making the screen and the keys. I put each letter, number a symbol on the keys and made the mouse. This was pretty simple to do. The ports, I had to put a little more work into using many commands such as boolean difference, copy, and mirror. I made my own symbol that I put on the cover of the lap top. I added a few more details such as background images a picture that would show on the lap top screen.


Reflection
I first started off making my lap top with some ideas that I had already thought of. I wanted to make it as realistic as possible. Adding details to the keys, the ports, and the objects around it. Since I don't own a lap top or see one everyday, this project may be challenging at some parts. To create this lap top I looked at some pictures on the internet and got an idea on the detail put into lap tops. I see how lap tops have different aspects to them than computers. Creating this lap top increased my ability in Rhino and will prepare me for future projects. Some of the problems I encountered were getting all the proportions right, such as getting the cover to fit right with the bottom portion of the lap top. Overall I was succesful with this project and I liked how it came out.
Universal Design: Slicer Dicer

The Slicer Dicer is used to easily cut food into slices. Basically anyone is able to use The Slicer Dicer. How it works: Put your food in the slot, push down and your food will be cut by the razors inside. Having a complicated design can cause problem and might not always turn out right. My universal design is simple, it doesn't have any electronics to make it work. The Slicer Dicer can be used by a normal average person and can also be used by people with disabilities.
Feedback
-Cade
Tutorial: Crossbow
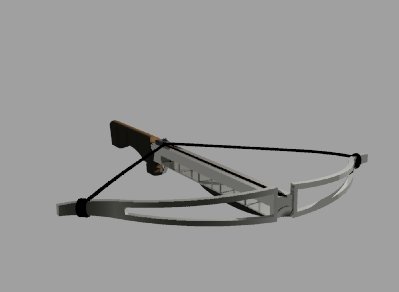
Bend-Deforms objects by bending along a spine arc.
MoveEdge-Moves a polysurface edge.
Taper-Deforms an object by moving its control points toward a specified axis.


